
By Chris Pranger
Finding motivation to exercise can be very, very hard, especially when you’re depressed. It’s also very, very hard to determine whether the lack of interest in exercising is caused by the depression, or if the depression is in part caused by ceasing exercise. Either way, it’s been over half a month since I hopped on the bike and rode through Greater Mushroom Kingdom.
There’s a chance that my lack of motivation also comes from my place in the game. Bowser’s Keep, being near the end of the game but not the very end of the game, doesn’t stick as readily in my mind as earlier sections. Much of Bowser’s Keep is fairly muted compared to the bombast of like Booster Tower or Nimbus Land, though I do remember that there’s a section that is best described as “a slog.” Halfway through Bowser’s Keep is a series of numbered doors between 1 and 6. Walking through a door sends you through either a battle gauntlet or a unique puzzle, some of which really stop me dead in my tracks unless I have a strategy guide in front of me.
But we’re WAY ahead of where I actually am, because we just obtained the sixth star and don’t yet have a way to the seventh in Bowser’s Keep. This is remedied with a quick trip back to King Nimbus for permission to ride the royal bus!
Here’s probably the biggest misstep I’ve seen Timothy Woolsey make so far: The royale bus is just called the royale bus, not the Nim-Bus. As a localization person, and a localization person working with Nintendo properties no less, leaving the obvious pun on the table is a high crime. All puns must be observed lest the game be weaker as a result. Now Super Mario RPG is only 98 stars out of a possible 100. Great.
I noticed that the royale bus has a logo on it with the initials JB, which means nothing to my filthy casual mind. According to the Mario Wiki, it stands for Jugem Bus, and that Jugem is the Japanese name for Lakitu. I did not know this fact! Jugem sounds weird to me but then again Lakitu sounds weird too, so who can say?
Session 13: Bowser’s Keep to Factory
There’s a chance that my lack of motivation also comes from my place in the game. Bowser’s Keep, being near the end of the game but not the very end of the game, doesn’t stick as readily in my mind as earlier sections. Much of Bowser’s Keep is fairly muted compared to the bombast of like Booster Tower or Nimbus Land, though I do remember that there’s a section that is best described as “a slog.” Halfway through Bowser’s Keep is a series of numbered doors between 1 and 6. Walking through a door sends you through either a battle gauntlet or a unique puzzle, some of which really stop me dead in my tracks unless I have a strategy guide in front of me.
But we’re WAY ahead of where I actually am, because we just obtained the sixth star and don’t yet have a way to the seventh in Bowser’s Keep. This is remedied with a quick trip back to King Nimbus for permission to ride the royal bus!
Here’s probably the biggest misstep I’ve seen Timothy Woolsey make so far: The royale bus is just called the royale bus, not the Nim-Bus. As a localization person, and a localization person working with Nintendo properties no less, leaving the obvious pun on the table is a high crime. All puns must be observed lest the game be weaker as a result. Now Super Mario RPG is only 98 stars out of a possible 100. Great.
I noticed that the royale bus has a logo on it with the initials JB, which means nothing to my filthy casual mind. According to the Mario Wiki, it stands for Jugem Bus, and that Jugem is the Japanese name for Lakitu. I did not know this fact! Jugem sounds weird to me but then again Lakitu sounds weird too, so who can say?
A short ride on the Jugem Bus brings us to Bowser’s Keep and full circle both thematically and literally. Thematically as this is where the game all began, with Mario rushing in to stop Bowser. Literally in that the world map takes you clockwise through the areas before circling back around to Bowser’s Keep before connecting back to Mario’s Pad.
Since we’re in Bowser’s Keep, Bowser has a few quick words to start things out for us. We’ve seen the character go through a lot of growth throughout the game, so seeing him sort of soak in his home is nice, especially considering that despite the world being in peril, Mario, Toadstool, and Mallow all technically have a home they can go back to any time. Bowser’s been booted from his home until this point in the story and now that he has the right team with him, he’ll be able to reclaim it.
It really only felt right to let Bowser take point in battles again with Mario and Toadstool on the wings. As mentioned last time, Toadstool now has her frying pan while Mario has the Lazy Shell, which basically means that all enemies are always about two hits away from death. Despite Geno being a little stronger, Bowser has the far superior defense, plus he has the added ability to scare away most of the enemies you encounter within Bowser’s Keep.
Speaking of enemies, we’ve pretty much hit the limits for new enemies, though that’s not a big deal since we’re in Bowser’s Keep. What I mean is, although we’re mostly fighting Koopas (Terra Cottas), Goombas (Gu Goombas), and Koopa Paratroopas (Malakoopas), it feels correct to be fighting the standard Mario enemies here in one of the staples of the Mario lore. Bowser’s Keep SHOULD be crawling with standard baddies, even if they’re pushovers.
And they really are pushovers. I managed to plow headfirst through most of the first half of the area with more or less full health. My levels are all around 23 and my strength is overwhelming, so the measly enemies I’m going against aren’t posing a threat whatsoever. I manage to make it to the six doors without even needing to use the full-heal mushroom. Right before the doors is our good pal Croco, no longer a villain but now acting as a shopkeeper with the Nimbus Land armor set and some healing items should you need to stock up.
Now that we actually are at the six doors, I can mention exactly why these doors stop me dead in my tracks. At the end of each of the six doors is a chest with one of six items. Said items are either legendary weapons for each of the characters (minus Mario) or a Rock Candy, which is a pretty powerful item that I never use because I don’t use items. In theory you just have to decide to go through all six doors, right? Wrong. Beating four doors sends you to the next section and becomes a one-way trip, meaning that if you miss something you have to come back and try again later.
My tactic is going to be very simple: go sequentially. Door number 1 immediately puts me into a battle gauntlet, which due to my power leveling poses no danger and is purely just time-consuming. There are two possible battle gauntlets and this first one is the “easier” one. It’s just 12 battles in a row. Beat an enemy, walk forward, start a new battle. The only fun thing to note here is that Mario is sometimes hitting for more than 600 points of damage, which feels outrageous but won’t seem to crazy by the end of this area. I also encountered the Shaman enemies once more and still haven’t let them attack, meaning I’m pretty much finishing the game without once seeing what their moves look like. Beating this gauntlet rewards me with Geno’s most powerful weapon, the Star Gun.
Going through door number 2 presents me with an action stage where I have to leap from moving tiles over lava until I reach the other side. Along the way I can grab coins (unnecessary) and items (also unnecessary). I’m given 10 chances to clear all three rooms and nearly wiff it but squeak by on my last try, rewarding me with Mallow’s most powerful weapon, the Sonic Cymbals. While in this action stage I also managed to hit the maximum number of Flowers in the game, 99, meaning I’m as decked out as I can possibly be.
Door number 3 turns out to be another action stage with yet more lava to avoid. Most of these two action stage doors are forgettable, except for one room in this second action stage that pays homage to the original Donkey Kong with a Changed Kong hurling barrels down a series of platforms that you have to leap over. It’s a cute final nod to Mario fans and ultimately results in me getting Toadstool’s strongest weapon, the Super Slap. Except it’s not her strongest weapon, the frying pan is her strongest weapon. I don’t actually know what the Super Slap looks like as I’ve never used it because I’ve always had the frying pan. I assume it involves some slapping but one can never assume in this game.
My fourth and final door is door number 4, which turns out to be another battle gauntlet. I’ve shifted Geno back into the party as his Star Gun outranks Bowser by a bit in terms of attack, though getting the timing just right for the Star Gun is kind of tricky. Geno throws both arms in front of him as his hands break away to then fire stars at enemies, which sounds a lot cooler than it ultimately looks. I actually think the Star Gun is a bit of a letdown and both looks and sounds unsatisfying. Oh well, the numbers don’t lie, and Geno’s attacks are doing well, carrying me through this gauntlet without any difficulty whatsoever, even against the final Chester enemy that pops a Bahamut enemy out for the fight, a nice little Final Fantasy nod (though Bahamut here looks super dorky and Mario-fied).
Beating door number 4 gives me Bowser’s strongest weapon, the Drill Claw, a weapon that IS visually and audibly satisfying as Bowser slashes and then punches with what looks like a sparkling fist. I always imagined that the punch has his knuckles drilling into enemies, and because of that I shift him back into the party for the moment. Somehow I’ve managed to go through the six challenge doors perfectly the first time, meaning all I left behind were the Rock Candy items. I couldn’t be more relieved.
With the doors dealt with, I’m about to go into pretty much three boss fights to end the area out, the first against Magikoopa. I remember getting excited as a kid when I got into this fight as the attract mode for the game shows Mario and Mallow about to fight a Magikoopa boss in the Forest Maze before Geno steps in and is introduced (a scene that does not happen in the game itself). Now, here we are, finally fighting the last holdout from enemies seen in the intro. And he’s very simple. Few rounds and he’s down for the count, even after he tries creating a clone of Jinx to join him in battle.
Defeating Magikoopa doesn’t kill him though, which is always a little relieving. Instead, it turns him from red to blue, essentially removing his brainwashing and leading to a moment with Bowser where he once more gives his blessing to a former soldier. In return, Magikoopa creates a golden chest that spawns infinite coins, which means that if money wasn’t useless yet, it sure is now.
Before moving on, I shift Geno back into the party and visit a side room where Croco appears yet again, this time selling the strongest individual armor pieces for each character. Since I’m valuing damage over defense or strategy, no one is wearing the Lazy Shell armor (which chops attack and speed down but cranks defense way up). Bowser and Geno have also opted to continue wearing the Work Pants from Moleville as those raise your attack power and the loss of attack power is a sacrifice I don’t feel like making. Mario, Mallow, and Toadstool dress their best and we head on.
After another random room with some Thwomps and Big Bertha enemies (cannons that fire Bullet Bills), I encounter the second boss fight of Bowser’s Keep, Boomer. Boomer is a weird samurai that also looks sort of like a chess piece. As a kid I was confused by this random boss and as an adult I’m still confused. The boss even has some unique dialogue to add character, presenting him as an honor-bound warrior. The fight itself is fairly simple as his thing is he shifts between blue and red colors with one having more defense and one having more attack power.
Really, Boomer feels like cut content somewhere along the line, as if he was meant to have greater significance to the seventh star’s arc but was ultimately chopped down into a single encounter out of nowhere. I wish he’d had a more unified connection to the other Smithy Gang bosses, but no matter, I think I was able to stomp him in three turns max.
Beating Boomer has a little melodrama as he does the honorable thing and decides to take a fall. It’s fitting that the fight with Boomer takes place on chandeliers similar to the first fight you have against Bowser at the very beginning of the game, though here you’re met with a weird little interlude both with the sad music playing as Boomer “takes a dive” by telling his Chandeli-Ho to drop him, smashed right into your Chandeli-Ho zooming you to the top floor, acting like it’s an elevator, all while your characters dance around to the Midas River Run music. So strange.
But here we are, the top of Bowser’s Keep, face-to-face with Exor, the giant sword that started it all. The first time I ever made it to Exor, I thought I’d reached the final fight of the game. It’s not outlandish, this was the first imposing enemy to appear, towering above the world. Plus, advertisements incorrectly talked about “Smithy the Sword”, leading a ton of players into believing even before starting the game that this sword was Smithy.
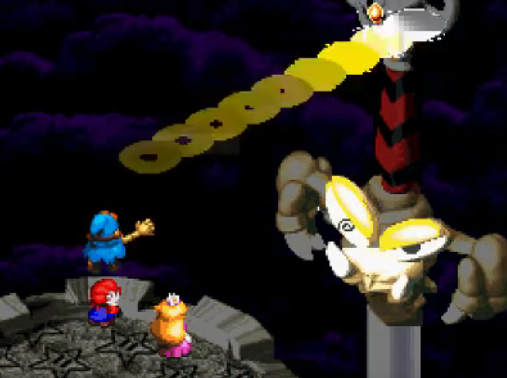
Nope, this sword is Exor, and he is one mean cuss. His fight is another unique one, though not too out of the ordinary for RPGs. Exor is made up of four parts, those being the Left Eye, the Right Eye, the Neosquid (the mouth but I have no clue why it was named so weird), and Exor himself as the little decoration at the end of the hilt. While you can temporarily knock out the other pieces, you won’t win the fight unless Exor himself is defeated.
Normally this fight is rough as the two eyes can rip out some astonishing spells, and the mouth can break out Corona among other things, which will devastate and zonk an under-leveled team. Only problem is, I’m not under-leveled, and I’m not ignorant to the biggest trick to this whole fight. While Exor can’t be damaged until the eyes are knocked out, once he’s vulnerable you can strike Exor with full force and topple him instantly with a Geno Whirl. Exor normally has 1,800 HP, but Geno Whirl, when timed correctly and against enemies weak to it, will hit for the max 9,999 damage. As a child, I didn’t know that Exor was weak to Geno’s insta-KO but I know now and absolutely polished Exor off in two turns. Hearing that spark and popping 9,999 is extremely satisfying. I utterly rekt Exor, and I don’t regret a thing.
Upon defeat, Exor’s mouth lolls open, sucking the party in. A somewhat twist to the story is that Exor’s primary purpose is to act as a gateway between Smithy’s world and Mario’s rather than to specifically act as a soldier. And if you thought things were weird before, Smithy’s factory dimension is where it really goes off the rails.
Geno takes a moment to let the gravitas of the situation fully sink in while Bowser pops out to mention that, hey, his keep is officially liberated, so why see things through? Geno’s response to all of this is great as he just laughs and then dresses Bowser down in the simplest terms, explaining that if Exor is the nexus point between dimensions, then Bowser’s Keep will be continually overrun as soon as Smithy sends more troops. Ultimately, Bowser manages to save face by remaining a part of the team as “no one disrespects the Koopa Troop.” It’s a cute interaction to say the least.
With that out of the way, there’s nothing left to do but continue on into Smithy’s factory and meet with him at last. But that will have to wait until next time. The finale is upon us! Get rekt, Smithy!
Current Feelings:
Since we’re in Bowser’s Keep, Bowser has a few quick words to start things out for us. We’ve seen the character go through a lot of growth throughout the game, so seeing him sort of soak in his home is nice, especially considering that despite the world being in peril, Mario, Toadstool, and Mallow all technically have a home they can go back to any time. Bowser’s been booted from his home until this point in the story and now that he has the right team with him, he’ll be able to reclaim it.
It really only felt right to let Bowser take point in battles again with Mario and Toadstool on the wings. As mentioned last time, Toadstool now has her frying pan while Mario has the Lazy Shell, which basically means that all enemies are always about two hits away from death. Despite Geno being a little stronger, Bowser has the far superior defense, plus he has the added ability to scare away most of the enemies you encounter within Bowser’s Keep.
Speaking of enemies, we’ve pretty much hit the limits for new enemies, though that’s not a big deal since we’re in Bowser’s Keep. What I mean is, although we’re mostly fighting Koopas (Terra Cottas), Goombas (Gu Goombas), and Koopa Paratroopas (Malakoopas), it feels correct to be fighting the standard Mario enemies here in one of the staples of the Mario lore. Bowser’s Keep SHOULD be crawling with standard baddies, even if they’re pushovers.
And they really are pushovers. I managed to plow headfirst through most of the first half of the area with more or less full health. My levels are all around 23 and my strength is overwhelming, so the measly enemies I’m going against aren’t posing a threat whatsoever. I manage to make it to the six doors without even needing to use the full-heal mushroom. Right before the doors is our good pal Croco, no longer a villain but now acting as a shopkeeper with the Nimbus Land armor set and some healing items should you need to stock up.
Now that we actually are at the six doors, I can mention exactly why these doors stop me dead in my tracks. At the end of each of the six doors is a chest with one of six items. Said items are either legendary weapons for each of the characters (minus Mario) or a Rock Candy, which is a pretty powerful item that I never use because I don’t use items. In theory you just have to decide to go through all six doors, right? Wrong. Beating four doors sends you to the next section and becomes a one-way trip, meaning that if you miss something you have to come back and try again later.
My tactic is going to be very simple: go sequentially. Door number 1 immediately puts me into a battle gauntlet, which due to my power leveling poses no danger and is purely just time-consuming. There are two possible battle gauntlets and this first one is the “easier” one. It’s just 12 battles in a row. Beat an enemy, walk forward, start a new battle. The only fun thing to note here is that Mario is sometimes hitting for more than 600 points of damage, which feels outrageous but won’t seem to crazy by the end of this area. I also encountered the Shaman enemies once more and still haven’t let them attack, meaning I’m pretty much finishing the game without once seeing what their moves look like. Beating this gauntlet rewards me with Geno’s most powerful weapon, the Star Gun.
Going through door number 2 presents me with an action stage where I have to leap from moving tiles over lava until I reach the other side. Along the way I can grab coins (unnecessary) and items (also unnecessary). I’m given 10 chances to clear all three rooms and nearly wiff it but squeak by on my last try, rewarding me with Mallow’s most powerful weapon, the Sonic Cymbals. While in this action stage I also managed to hit the maximum number of Flowers in the game, 99, meaning I’m as decked out as I can possibly be.
Door number 3 turns out to be another action stage with yet more lava to avoid. Most of these two action stage doors are forgettable, except for one room in this second action stage that pays homage to the original Donkey Kong with a Changed Kong hurling barrels down a series of platforms that you have to leap over. It’s a cute final nod to Mario fans and ultimately results in me getting Toadstool’s strongest weapon, the Super Slap. Except it’s not her strongest weapon, the frying pan is her strongest weapon. I don’t actually know what the Super Slap looks like as I’ve never used it because I’ve always had the frying pan. I assume it involves some slapping but one can never assume in this game.
My fourth and final door is door number 4, which turns out to be another battle gauntlet. I’ve shifted Geno back into the party as his Star Gun outranks Bowser by a bit in terms of attack, though getting the timing just right for the Star Gun is kind of tricky. Geno throws both arms in front of him as his hands break away to then fire stars at enemies, which sounds a lot cooler than it ultimately looks. I actually think the Star Gun is a bit of a letdown and both looks and sounds unsatisfying. Oh well, the numbers don’t lie, and Geno’s attacks are doing well, carrying me through this gauntlet without any difficulty whatsoever, even against the final Chester enemy that pops a Bahamut enemy out for the fight, a nice little Final Fantasy nod (though Bahamut here looks super dorky and Mario-fied).
Beating door number 4 gives me Bowser’s strongest weapon, the Drill Claw, a weapon that IS visually and audibly satisfying as Bowser slashes and then punches with what looks like a sparkling fist. I always imagined that the punch has his knuckles drilling into enemies, and because of that I shift him back into the party for the moment. Somehow I’ve managed to go through the six challenge doors perfectly the first time, meaning all I left behind were the Rock Candy items. I couldn’t be more relieved.
With the doors dealt with, I’m about to go into pretty much three boss fights to end the area out, the first against Magikoopa. I remember getting excited as a kid when I got into this fight as the attract mode for the game shows Mario and Mallow about to fight a Magikoopa boss in the Forest Maze before Geno steps in and is introduced (a scene that does not happen in the game itself). Now, here we are, finally fighting the last holdout from enemies seen in the intro. And he’s very simple. Few rounds and he’s down for the count, even after he tries creating a clone of Jinx to join him in battle.
Defeating Magikoopa doesn’t kill him though, which is always a little relieving. Instead, it turns him from red to blue, essentially removing his brainwashing and leading to a moment with Bowser where he once more gives his blessing to a former soldier. In return, Magikoopa creates a golden chest that spawns infinite coins, which means that if money wasn’t useless yet, it sure is now.
Before moving on, I shift Geno back into the party and visit a side room where Croco appears yet again, this time selling the strongest individual armor pieces for each character. Since I’m valuing damage over defense or strategy, no one is wearing the Lazy Shell armor (which chops attack and speed down but cranks defense way up). Bowser and Geno have also opted to continue wearing the Work Pants from Moleville as those raise your attack power and the loss of attack power is a sacrifice I don’t feel like making. Mario, Mallow, and Toadstool dress their best and we head on.
After another random room with some Thwomps and Big Bertha enemies (cannons that fire Bullet Bills), I encounter the second boss fight of Bowser’s Keep, Boomer. Boomer is a weird samurai that also looks sort of like a chess piece. As a kid I was confused by this random boss and as an adult I’m still confused. The boss even has some unique dialogue to add character, presenting him as an honor-bound warrior. The fight itself is fairly simple as his thing is he shifts between blue and red colors with one having more defense and one having more attack power.
Really, Boomer feels like cut content somewhere along the line, as if he was meant to have greater significance to the seventh star’s arc but was ultimately chopped down into a single encounter out of nowhere. I wish he’d had a more unified connection to the other Smithy Gang bosses, but no matter, I think I was able to stomp him in three turns max.
Beating Boomer has a little melodrama as he does the honorable thing and decides to take a fall. It’s fitting that the fight with Boomer takes place on chandeliers similar to the first fight you have against Bowser at the very beginning of the game, though here you’re met with a weird little interlude both with the sad music playing as Boomer “takes a dive” by telling his Chandeli-Ho to drop him, smashed right into your Chandeli-Ho zooming you to the top floor, acting like it’s an elevator, all while your characters dance around to the Midas River Run music. So strange.
But here we are, the top of Bowser’s Keep, face-to-face with Exor, the giant sword that started it all. The first time I ever made it to Exor, I thought I’d reached the final fight of the game. It’s not outlandish, this was the first imposing enemy to appear, towering above the world. Plus, advertisements incorrectly talked about “Smithy the Sword”, leading a ton of players into believing even before starting the game that this sword was Smithy.
Nope, this sword is Exor, and he is one mean cuss. His fight is another unique one, though not too out of the ordinary for RPGs. Exor is made up of four parts, those being the Left Eye, the Right Eye, the Neosquid (the mouth but I have no clue why it was named so weird), and Exor himself as the little decoration at the end of the hilt. While you can temporarily knock out the other pieces, you won’t win the fight unless Exor himself is defeated.
Normally this fight is rough as the two eyes can rip out some astonishing spells, and the mouth can break out Corona among other things, which will devastate and zonk an under-leveled team. Only problem is, I’m not under-leveled, and I’m not ignorant to the biggest trick to this whole fight. While Exor can’t be damaged until the eyes are knocked out, once he’s vulnerable you can strike Exor with full force and topple him instantly with a Geno Whirl. Exor normally has 1,800 HP, but Geno Whirl, when timed correctly and against enemies weak to it, will hit for the max 9,999 damage. As a child, I didn’t know that Exor was weak to Geno’s insta-KO but I know now and absolutely polished Exor off in two turns. Hearing that spark and popping 9,999 is extremely satisfying. I utterly rekt Exor, and I don’t regret a thing.
Upon defeat, Exor’s mouth lolls open, sucking the party in. A somewhat twist to the story is that Exor’s primary purpose is to act as a gateway between Smithy’s world and Mario’s rather than to specifically act as a soldier. And if you thought things were weird before, Smithy’s factory dimension is where it really goes off the rails.
Geno takes a moment to let the gravitas of the situation fully sink in while Bowser pops out to mention that, hey, his keep is officially liberated, so why see things through? Geno’s response to all of this is great as he just laughs and then dresses Bowser down in the simplest terms, explaining that if Exor is the nexus point between dimensions, then Bowser’s Keep will be continually overrun as soon as Smithy sends more troops. Ultimately, Bowser manages to save face by remaining a part of the team as “no one disrespects the Koopa Troop.” It’s a cute interaction to say the least.
With that out of the way, there’s nothing left to do but continue on into Smithy’s factory and meet with him at last. But that will have to wait until next time. The finale is upon us! Get rekt, Smithy!
Current Feelings: