
By Chris Pranger
Session 14: Factory to Finale
Here we are at the final push. The ending section of a game is always the hardest, not necessarily because it’s actually difficult (not always), but rather because the realization that this thing you enjoy will shortly be coming to an end. For me, Super Mario RPG is a very enjoyable experience, one that I gladly revisit every few years, and once more I’m struck with that pang of sadness. I really like this version of Mario’s World. I want to see more of this Toadstool, more of this Bowser. I want to see Mallow and Geno return. And I want Mario to have an edge, not just the simple happy-go-lucky blank slate in the Paper Mario series onward.
Usually in an RPG you’ll have a few endgame options to keep you busy. In Final Fantasy 6 for example I could search for every last Esper and raise each character to level 99. In Fire Emblem Awakening I could partner everyone up and improve their support ranks. In Super Mario RPG, I sort of don’t have a real endgame to continue through. Everything is so streamlined that I can either handle optional bosses when they’re presented to me (Jinx and Culex, specifically), or there’s very little need to force myself through the trouble (like grinding to level 30). Yes, there are still some hidden chests around the game, but without a real reward for finding every last one there’s not much drive to look. I could push myself to do 100 consecutive Super Jumps to get the most powerful armor in the game, but getting the Super Suit really isn’t worth it when I’m already so overpowered as-is.
My biggest question is whether I should actually grind each character to level 30, which isn’t overly time-consuming as there are some enemies in the Factory that dish out a ton of experience points, but it’s another unnecessary step in this playthrough since fighting enemies like normal will already push me up to at least level 26 before reaching Smithy for the final showdown. We will have to wait and see once I get deeper into the Factory.
But first, there is one little diversion I want to take. In Moleville, one of the moles sells fireworks for 500 coins each. You can only purchase one at a time, and they have no actual purpose within the game other than to be an item you need to trade for the Shiny Stone that opens the door to Culex. It seems strange to drop 500 coins for one, trade it away, and then have the option to buy a second one without any indication that it’ll have any benefit. You can only ever have one firework at a time, which suggests they’re important, but again, you can’t use them like an attack or anything at all. Selling them returns 250 coins and the chance to buy yet another one, but again, nothing indicates that you’re doing anything of value. However, my goal for this playthrough is to buy five total across the game for reasons I’ll explain later, which means before really getting into the weird void of Smithy’s realm I’ll first make a quick stop in Moleville. With fireworks in hand, I’m back to the Gate that leads to the Factory.
I love the music for the Factory. It really feels like a proper final area music choice, sounding strange but familiar at the same time. Combined with the visuals getting extremely trippy and a little unsettling, the final area is a great finale and a great setting for the series of boss fights I’ll soon encounter.
The early section of the Factory involves a lot of small platforms connected via bolts on screws, requiring you to hop on the bolt to thread it and get you closer to the other side, a little stage element first seen in Super Mario Bros. 3. A misstep on these bolts sends you falling down onto a trampoline that launches you right back up to try again. Nothing too harsh, just a minor inconvenience, which I appreciate as all of these bolt jumps are done at the same weird diagonal angle as every other platforming challenge in this game. As Mario or RPG fans might expect, there is one area a bit later on that I need to purposely fall down to find some secrets, though I assure you it’s nothing special. I also eventually acquire the Ultra Hammer, Mario’s final weapon. It is, sadly, not more powerful than the Lazy Shell though, so there’s no point in using it. Just another thing to add to my stockpile of unused things.
The enemies are mostly reused yet again, to an even more extreme as I’ll mention later. The main enemy theme is ghosts for some reason. Probably because ghosts are spooky and it’s time to get spooked. There is, however, a new little guy called the Ameboid, which on first inspection appears to be a little blue fungus like the mushroom cap enemies from earlier in the game. Enhancing reveals that they are not in fact mushrooms but amorphous blue blobs. They’re extremely weak and appear as a single enemy, so most hits instantly KO them, but should you fail to pop them in one shot, they’ll multiply and then start prolonging the fight with status ailments. Cute, simple, and inoffensive. A good addition late in the game.
Before long I’ve reached the first boss encounter in the Factory, a giant clock named Count Down. This fight is unique in that you know exactly what Count Down will do based on the hands on its clock face. Every turn it ticks the hands more and more, going through the set attacks for each. Meanwhile, two Ding-a-Ling bells sit on top and act as the real threat, so those are the first to get dinged. Once the bells are gone, time flies. I actually get a really lucky break and despite hitting my team with Petal Blast, the attack misses Toadstool, allowing her to heal the team’s status ailments.
Following Count Down, the Factory space continues on, now adding conveyor belts and exuding much more of a factory feel. And this is where things really start to fall into place. Down the conveyor belt come an endless supply of enemies, starting with new versions of the Axem Rangers. Each of these fights consists of two Axem Blacks and two Axem Yellows, which means they’re toast pretty quick. Right after facing these Axem hacks I find that secret spot where I need to fall in order to get a pair of chests that reward a Flower (I’m already maxed out) and a full heal. A disappointing final secret.
New enemies appear here, including Drill Bits and Mad Mallets, two tool-like enemies that fit the theme of the factory. I also encounter a new, stronger version of the Shyster enemy from the first star arc, accompanied by a machine-made version of Mack. It was a delight to see that Mack is back on infinite loop since it’s been so long since Mario and Mallow rolled over him. Despite getting a huge boost over his original form, he’s little more than a random enemy encounter here.
These conveyor belts are a very good place to grind, if I choose to. While moving around, Aeros fly in and stun you, just like during the Rose Town arc surrounding the second star. If I get stunned and stumble into a battle, I have to be ready to move immediately following the victory screen, otherwise another Aero will come down and lock me into another battle. This does however give me a chance to encounter another new enemy, the Hippopo, a cute blue hippo enemy with a little monster on its back. Every area gets one larger unique enemy, and the Hippopos are the final instance in the game.
Following Mack’s return is Bowyer, complete with his ability to turn off one of your actions after two turns. I’m a bit too strong for him though, so he’s unable to make it past a turn and a half. Along with more Bowyers comes yet more Axem Rangers, this time battles with Axem Green, Axem Pink, and Axem Red. Yet again, one shoot to each clears them out.
Finally we see the last big boss make an encore: Yaridovich. Hopping around in an area with new enemies called--get this--Ninjas, Yaridovich is presented as a somewhat intimidating prospect. The Ninja enemies themselves are simple enough to dispatch, though they have a unique skill where they attack after sustaining mortal damage, basically ensuring they get the last laugh. Yaridovich does not however get a single laugh as they don’t make ‘em like they used to. Battling Yaridovich clones is probably the best experience payout by the way. For just a few turns of attacks, you’re rewarded with 60 experience points. Not bad.
The Factory up until this point has clarified a few things for me. For starters, it really puts the threat of Smithy into perspective. While the main story hinged entire arc finales on defeating these individual lieutenants, here we see that Smithy can mass produce them at a rate of basically one new top soldier every three seconds. Sure, this area is very video gamey, but it doesn’t change the implications of just how screwed the Mushroom Kingdom would be without Mario’s overpowered team.
Furthermore, we can see just who is and who isn’t with Smithy. Punchinello’s absence suggests that he really wasn’t working for Smithy, answering that question entirely. Similarly, Belome is also AFK, proving that he was just a random temple guardian of some sort that liked to eat people. You know, standard temple guardian stuff. It is odd that Boomer doesn’t appear here, which supports my theory that further content with him got cut late in development, but it could also in-world be explained that since Boomer didn’t technically die (that we saw anyway), there’s no reason to produce more of him. We may never know.
Once defeating a Yaridovich clone, Mario’s posse is “tricked” into progressing deeper into the Factory, beginning with a boss fight against a pair of enemies called Cloaker and Domino. Similar to the Knife Guy/Grate Guy fight, Cloaker is all physical strength and Domino is all magic. My team going forward is Mario, Geno, and Toadstool as Geno has the highest attack output, Toadstool can heal like no one else, and Mario is required. Cloaker’s physical attacks don’t pose much of a threat to anyone but Geno, the resident glass cannon, but Domino’s magic isn’t anything to scoff at. Still, Cloaker goes down first, moving us into the second half of this fight.
Instead of simply continuing the fight against Domino, the enemy retreats a little ways, prompting my party to step forward, at which point we see a giant snake. Domino leaps up onto its head and activates the Mad Adder, starting phase 2. I’ve made a very costly mistake here and Geno is still holding the Safety Ring, meaning he’s immune to all elemental attacks and status ailments, but the item is best given to Toadstool to avoid her falling asleep or turning into a mushroom, thus losing her most important role as healer. Domino and Mad Adder manage to keep hitting my team with extremely powerful magic attacks, one of which puts both Mario and Toadstool asleep. I manage to squeak by with Geno’s strength alone, but just barely.
Learning from my mistake, Toadstool and Geno swap accessories giving Geno the Amulet for maximum damage output and Toadstool the Safety Ring for maximum healing security. Just as predicted, the whole party has reached level 26, resting comfortably in the “easy” category of levels.
At last, the Factory starts to look like a factory with a conveyor belt moving Drill Bits down an assembly line. Mario encounters the Factory Clerk, a little horn-helmeted guy with some more hammer lackeys as backup. Mallow pops out and tells the guy to shut things down, which of course just leads to a fight. The result is as expected with Mario’s bunch coming out relatively unscathed. As soon as the battle is over, Mallow notices a green switch, so he goes and hops on it, causing a crane to come out of nowhere and try to grab him, only to have Mario save him. Mostly this little scene is here to tell us that the green switch will be used at some point to activate the crane, but also to provide one final character moment for Mallow.
An old friend suddenly shows up to help us out. Toad, the same one from the beginning (presumably) rushes into the room, saying he just got all the way into the Factory to help. Kudos to this Toad because that’s a heck of an accomplishment. Toadstool slides out and surprises Toad since he’s still under the impression that she’s safely back at the castle, but once he hears that he can help both Mario AND the princess, he’s excited to give me a Rock Candy and be the game’s last-chance shop.
The next room shows us another horned enemy, this one the Manager. Bowser walks out from Mario and demands Smithy’s goons get out of his keep, though the Manager is too busy addressing Mario to give Bowser the time of day. Despite being the clear instigator, Bowser is entirely ignored in favor of Mario, wounding Bowser’s pride and prompting the next fight. With the Manager effectively fired, Bowser has a little moment to pout where Mario cheers him up, causing Bowser to recite a quick haiku. I want this version of Bowser back, darn it. He’s too good to appear in just one game.
Next, Toadstool has words with the Factory’s Director, telling him in no uncertain terms that she expects the factory be shut down immediately. Since the Director isn’t about to do that, we get into yet another workplace dispute, ultimately forcing the Director into early retirement. Insert a severance joke here I suppose.
What I really like about these series of battles is that in each new room, you see the Drill Bits get a little less and less polished, witnessing their construction and exemplifying the setting. It’s eerie to see just how fast enemies can be built, and once more shows how helpless the world would be without Mario.
At last we come to the Factory’s final room and the Factory Chief, who looks like a Ninja enemy. The Factory Director has been expecting this fight and shows off the Gunyolk, perhaps one of the most bizzare enemies in an already bizzare game. It looks like a mixture between a smelting cauldron and a tank, and is one of the few enemies that’s fully vulnerable to every single status ailment, a fact that I forgot until after the fight. While not overly tough, I’d forgotten just how strong the Gunyolk can be. I certainly hadn’t remembered that it can fire off the Breaker Beam, the signature attack from the Axem Rangers. Upon defeating the Factory Chief, Mario reaches level 27.
With the workers wiped out, Geno appears to comment on how the Drill Bit assembly line hasn’t stopped, suggesting Smithy is in the next room, waiting to be challenged. Geno talks about how the journey is nearly over and then hints at what that really means for his involvement with the others, but cuts himself short of explaining the moment. Instead, Mario jumps onto a green switch, drawing over a crane that picks him up and carries him over to the pipe to Smithy.
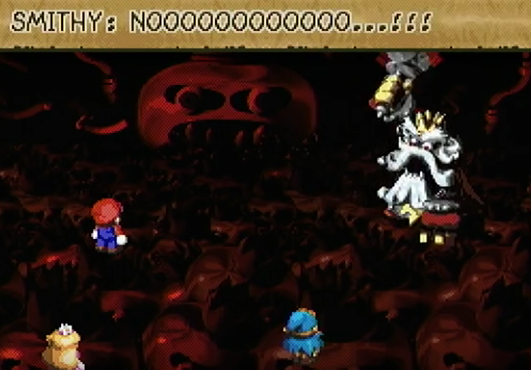
At long last, Mario and the rest of his friends stand face-to-face with Smithy. It’s odd to think that despite hearing about Smithy throughout the game, this is the first time we’ve actually seen him. If you had no idea what he looked like, what would you picture? I wasn’t prepared as a kid to see a mostly normal-looking character leering at my party, but here he was, big white beard, massive hammer, yellow star on his chest, and a gold crown on his head. This was THE Smithy, and it was go time.
Smithy is a great villain in that his mythos is well established by the time we arrive here. We’ve seen his minions and witnessed him slowly realize the importance and usefulness of the stars. Better yet, we’ve seen him come to understand who Mario is and the threat he faces to the Smithy Gang. Smithy’s moves have felt very calculated rather than just willy-nilly, and this final moment before the battle hits him home as an antagonist worth respecting at the very least. As Mario’s team each appear to say their piece, Smithy delivers maybe his most important line, stating that with the power of the stars, “We could build a world full of weapons.” The delivery gives me the good sort of chills, probably because Super Mario RPG is very in-line with the Mario brand, but also establishes that Mario’s world truly is threatened. This isn’t just Bowser wanting to own a castle and marry the princess. This is a warlord set on domination, subjugation, and endless war. And he must be stopped.
It shouldn’t feel like a spoiler, but this is only going to be part one of Smithy’s fight. We find ourselves in front of an anvil with a Smelter positioned off to the side. I can either attack that or face off against Smithy, with focusing all attacks on Smelter being the wiser decision as it can eventually provide Smithy with molten metal in which to mold a super strong version of the Shyster enemy (a Shyper), capable of using an attack called Sword Rain, which is exactly what it sounds like and hurts just as much. Leaving one Shyper unchecked next to Smithy using Meteor Swarm is bad enough, but get two Shypers on the field at once and you’re likely about to see a game over.
This fight does a good job of making Smithy sufficiently intimidating. His hammer feels weighty, and his theming around blacksmithing works well. Beyond the aforementioned Meteor Swarm attack, he also has an attack called Sledge that brings a giant hydraulic press to flatten the party. Once Smelter is knocked out and the Shypers are out of play, Smithy is pretty easy to take down since it’s a simple war of attrition, like most boss fights end up being. Heal more damage than you take and you’ll always win.
Upon sustaining enough damage, Smithy becomes enraged and begins slamming his hammer around, causing some low-level enemies to jump into the scene and plead with him to cool his temper, a request that does not work of course. The only thing that’s sort of weird here is that one of the enemies mentions that the foundation is pretty week since they just build the place yesterday. My mind reels attempting to make sense of it all. Does this mean the Factory itself was built yesterday? Just this particular floor? Have all the events transpired in a single day? I’ve slept at least a dozen times, were those full sleeps or just light naps? So many questions, but the only answer is to continue fighting as Smithy slams his hammer down once more, causing the floor to give way and send us all into a true hellscape.
We’re suddenly standing on a floor of metal heads, with more heads in the background and one in particular being large and intimidating. Smithy mentions he’s ready to reveal his true form, which resembles the dozens of other heads seen around. It’s not quite a robot head, not quite a skull, but it’s unsettling and puts me on edge.
Now the real final fight begins and Smithy doesn’t play around. I can either attack his head, which is the main place I have to strike to win the fight, or attack his body, thus paralyzing him momentarily from using his physical attacks such as his hammer or his own gun hand, which looks like a more advanced version of Geno’s gun hand. Really, this presents a very critical question that is absolutely not explored: is Geno, at least the doll, manufactured by Smithy?
As it’s been a while since I’ve played, I actually forgot that I can attack the body, so I focused exclusively on Smithy’s head. The big gimmick of this fight is that Smithy will begin switching between different heads, smacking his hammer against it to reshape it into one of four different forms. In fact, we only see the original head at the beginning, at which point it’s reshaped into either the tank head, the wizard head, the chest head, or the metal box head. Probably not the official names for each head, but that’s how I remember them.
Each head represents a different specialty. The tank head has high physical attack and defense, the wizard head has super high magic attack and defense but ridiculously low physical defense, the chest head can inflict a random status ailment to the whole party, and the metal box head has incredibly high physical and magical defense.
I usually end up seeing the tank head come first, which in addition to high physical defense can hit hard with Magnum, an instant KO move, or other strong physical blasts. The saving grace here is that he can only target one party member at a time, so healing is fairly simple.
He next transformed into the wizard head, which is where things always get the most intense. His magic attacks are unreal, with Sword Rain, Arrow Rain, Spear Rain, Meteor Swarm, Boulder, and Dark Star, all of which will devastate the entire party. As long as Toadstool can withstand the onslaught, she can heal everyone back to pretty much perfect health. During the wizard head phase, as long as I’m keeping everyone above the danger threshold, I can unleash as hard as possible with Mario’s Lazy Shell and Geno’s Star Gun. Hit hard and hit often and don’t stop for anything.
Eventually Smithy changes into the chest head, which looks like a mystery treasure chest. It attacks by randomly hitting everyone with mute, poison, fear, or scarecrow, which would be a threat if Toadstool wasn’t wearing the Safety Ring, thus keeping her from ever getting hit by one of these effects and leaving her free to undo the damage to the rest of the party instantly.
There’s no set order for Smithy to switch between heads, and clearly not a requirement to go through each one as the final head, the metal box one, I never saw on this playthrough. Normally it’s an almost coffin-shaped metal box that can resist pretty much every attack you throw at it while allowing Smithy to use recovery moves or Shredder, an attack that just takes away all your party’s boosts. Since I didn’t focus on boosting this playthrough, Shredder is the best move to see as it’s a free turn for me.
Instead of going to the metal box head, Smithy switched back to the tank, and then the wizard head, allowing me to keep the pressure on and finally crack his metal casing. With 8,000 HP, he’s the enemy in the game with the most longevity, though the Culex fight is technically far more difficult due to the crystals.
At last Smithy takes his final hit and goes into self-destruct mode, leaving the group with the final star. Geno congratulates Mario and asks him to send the last star to join the others. With all seven reunited, they begin glowing and land all around the party before flying off into the heavens. Geno is suddenly surrounded by a beam of light before the little star spark flies out of his doll body, leaving it behind. The group gathers around the now lifeless doll before the star spark pops out, dancing over each party member’s head to say goodbye. Geno flies away, never to be seen again.
Finally, Mario, Mallow, Bowser, and Toadstool stand on Vista Hill as Exor turns to dust and blows away, solidifying that the Smithy threat is really and truly over. The image of Exor in Bowser’s Keep is so iconic to this game that finally seeing it free of the giant sword is a powerful moment and punctuates the action with a firm realization that everything is about to get back to normal.
From here we get to see seven little wrap-up scenes, each one coming from a different of the seven stars. We see Mallow in Nimbus Land being crowned prince at last. We see Bowser and his Koopa Troop rebuilding his keep while an enemy makes off with his clown car. We see Croco racing Yoshis and attempting to cheat, only to still get beat by Yoshi. We see Booster and Valentina get married with Dodo officiating. We see Toadofski and his students singing along with Frogfucious. We see Johnny Jones looking off into the sunset. And finally we get a closeup render of Mario and Toadstool thanking the player for going on the adventure. Everything is wrapped up nice and neat.
But wait, there’s more! Perhaps the greatest moment of the entire game, during the credits, Luigi suddenly marches into the scene at the head of a parade. While staff names scroll by underneath, we’re treated to a final release of tension, showing all major characters strolling by on floats or just marching. A few highlight to this include Croco and one of his Sackit associates raiding Bowser Keep, prompting Bowser to pop out in a fury in his clown car and chase after them. Later on, Booster is seen riding in the clown car as his Snifits, Croco, and Bowser chase after him. We also see Smithy riding behind Mack, Bowyer, and Yaridovich before smashing them with his hammer.
Johnny appears with his pirate ship, carried along by King Calamari’s tentacles. The sun sets and the final bit of magic happens with Johnny’s ship lighting up in an homage to Disneyland’s Electric Light Parade. A few staple Mario items also pass by including a mushroom, a flower, and finally a star with Mario and Toadstool seated upon it. As they wave goodbye, Geno’s star spark flies around them before returning to Star Road again.
At last, we’re treated to fireworks, and this is where my insistence on purchasing at least five fireworks from the inventor in Moleville pays off since the fireworks show is a bit more impressive and ends with a final star-shaped firework explosion to cap things off.
Geno’s star spark appears one last time in front of the Star Road, dancing across it to spell THE END, turning into the D. After a few moments a lullaby version of the Super Mario theme begins playing and I start crying, same as I always do when I play this game.
My final thoughts on this game are about what my first thoughts were. Super Mario RPG is a damn good game that holds up after all these years. It delivers sincere character moments, hilarious comedy beats, and solid gameplay that keeps new players curious what will happen next and returning players hotly anticipating their favorite moments. It’s easy, for sure, but it’s a learned sort of easy. For a young player, they’ll likely struggle before they figure out the proper attack timing, or the best strategies for some bosses, or just how important grinding is. After 14 sessions, I racked up around 16 hours of total playtime. If I wanted to go for a full completion, it’d be about another hour of grinding for everyone to reach level 30 and another hour after that to find every last hidden chest, but neither task felt necessary. I had fun, and I’m sure I’ll have fun in a few years when my son is old enough to appreciate the game for his first playthrough. I can’t wait.
Now make Super Mario RPG 2 already, you cowards!
Finale Feelings: