
By Chris Pranger
Session 8: Rusty Bucket Bay
Today we venture into a world that’s dingy, depressing, and just downright unpleasant. Nope, we’re not heading back to Clanker’s Cavern, we’re going to the place where the skies are smoggy and the water is polluted. We’re going to Rusty Bucket Bay.
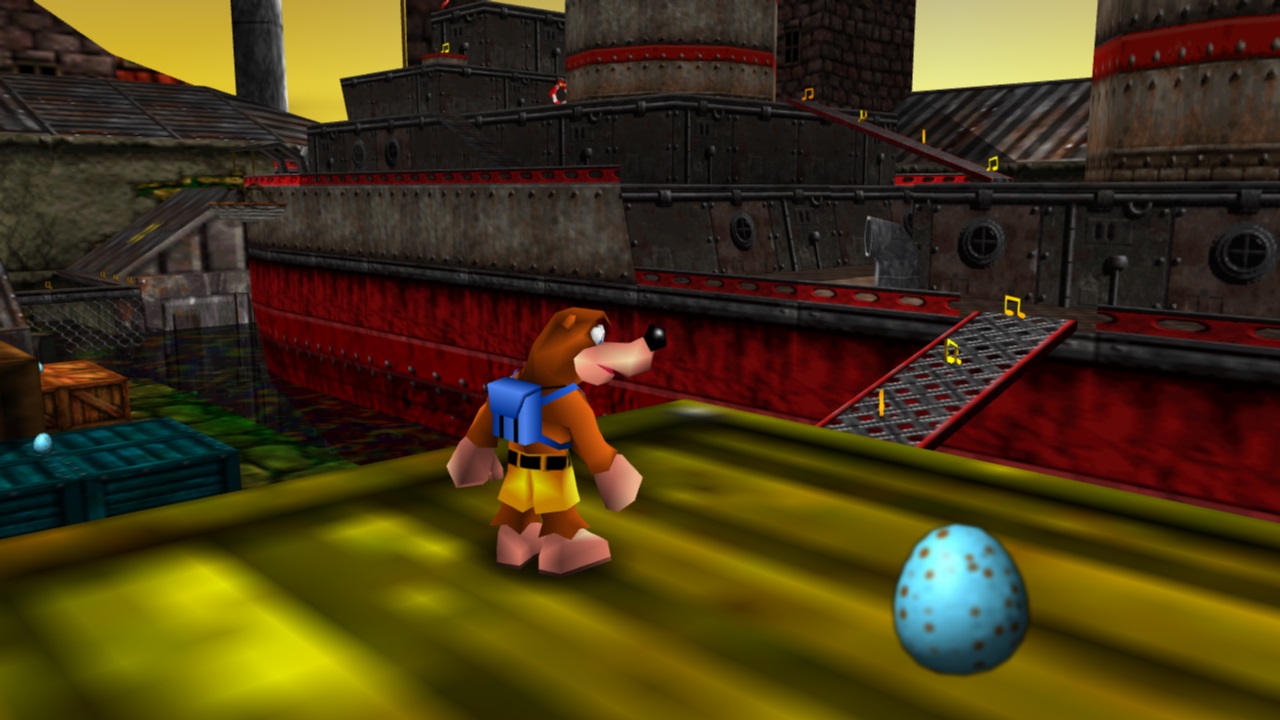
This world gets its name from the big ship sitting in the middle of the stage, the Rusty Bucket, presumably Grunty’s personal steamliner with a full crew of nautical goblins. Said goblins are definitely ironborn due to their increased health compared to typical enemies since they take two punches to knock out, or one aerial pecking.
The ship is adorned with a handful of new threats, chief among them evil life preservers that hop off the walls and try to chomp you, as well as sentient steam pipes that come to life and attempt to take a bite out of you, not to be confused with the non-sentient steam pipes that you can enter.
There are also boxes of TNT that jump around, trying to explode in your face, and the now-classic drain-popping monster fish, this time powerful enough to take two honeycombs of health per bite. Feels a bit odd that they’re the same monsters as before but suddenly deal more damage. Usually you’d expect to see them with a new color palette, which you do actually see with Grunty’s henchmen in her lair going from red cloaks to blue cloaks and then black cloaks. Here there is no such distinction and you’d never guess unless you let yourself get chomped.
My first instinct is to investigate the ship since it’s the largest setpiece in the area and what the bay is named for. Fun fact that I only now noticed is that on the back of the ship where you have the ship’s name, it mentions that it’s from Twycross, England. My guess is that’s where Rare was located during development, and a quick search using Google tells me that yes, I am correct. That’s cute, and also gives a weird real-world connection to this game. Fun lore is fun.
There are multiple ways to get into rooms of the ship, the first as I mentioned is through the steam pipes that are sometimes monsters. Another way in is through a single door on one of the smoke stacks, though that just leads to the engine room and I’m not ready to put myself through that hell yet.
The last way into various rooms is through portholes. Like in Mad Monster Mansion, some porthole windows can be broken and entered, though while in Mad Monster Mansion the tell was that the windows were lit up, indicating there was something in that room, here the portholes that can be smashed look nearly identical to the ones that can’t, and both just look like texture designs on the ship. The trick is to look for windows that have three little white light reflections off the glass rather than just two. I can’t even properly describe it, it’s such a minor detail and nothing outside a video gamer’s natural instinct to try and destroy things would point you to even try and break the windows, though there may actually be some hints if you watch the attract mode demo when you start the game up.
A fun little cameo shows up in the crew’s rest quarters where one of them has a picture of Conker up next to their bed. I have absolutely no clue if this was in the original or if it was added for the HD version, but it’s another cute nod to Rare’s other games.
After exploring a little bit, I decide to attempt the engine room, which turns fatal. Heading down into the engine brings you to the hardest platforming challenge of the game since one wrong move is instant death. This is the only place in the game where you suddenly have the threat of instant death, and it almost assuredly will happen since you have to jump between rotating engine blades that don’t slow enough to really let you through. In the N64 version, death meant restarting the world and having to recollect each music note and Jinjo. Thankfully the Rare Replay version doesn’t add that bit of tedium for the biggest difficulty spike the game has to offer. Because of this, I place Rusty Bucket Bay as the hardest world, and also my least favorite because it just doesn’t feel fun, though to its credit it is a very original world compared to the others.
To the left of the entrance are some warehouses that I can enter either by smashing a skylight window or swimming through some open holes. There’s also a corner of the world with a yellow Jinjo on a buoy and the return of Snacker the shark. The water all over Rusty Bucket Bay is dangerous enough without the shark adding to it though as it’s covered in oil, so you lose air twice as fast and can’t recover it unless you get completely out of the water and stand on a dry surface. I still haven’t drowned, but it makes traversing water less enjoyable, if you could think such a thing was possible.
In another corner of the world, past the warehouses, is a pool of glowing green toxic waste with a green Jinjo on a barrel, waiting to be picked up. For those keeping track, we have encountered regular water, oily water that takes air twice as fast, swamp water filled with piranhas, icy water too cold to touch, liquid sand filled with sand eels, either more swamp water or poison water in Mad Monster Mansion, and now toxic waste. I’m counting seven different types of water here, not including lava. That’s a lot of water.
Back aboard the Rusty Bucket I manage to find the kitchen to collect a few more music notes while avoiding the ship’s crew and also the ovens should I feel the misguided need to jump into them. Nearby is the navigation room with some more crew members and really just a good excuse to actually flesh out this ship with the appropriate locations, which is a nice touch. Finally is the captain’s quarters, which contain a Jiggy in a closet as well as another Stop ‘n’ Swap egg on the bed.
Out near the front of the ship (I forget nautical terms, so I’m going with “front” for clarity) are a trio of whistles that I can play by stomping them. They’re labeled 1, 2, and 3, which when played in the correct order spit out a Jiggy. The correct order is shown on the side of the ship behind an evil life preserver, so observant players will figure this out quick. Less observant players will probably never get the solution to this, but I don’t know how they got this far to begin with.
Time to climb the smoke stacks and see what’s at the top of the stage. Heading up one leads me across a bridge to the other and then back and forth, collecting music notes on the bridges before getting a Jiggy at the top of one. There’s something very satisfying about climbing ever higher and getting music notes along the way, especially since the music notes are so spread out in this world with as few as three or four hanging out together in some random room of the ship.
On the far side of the world are a pair of cranes, one that needs to be raised to lift a cage around a Jiggy, and one that needs to be lowered to drop a TNT box onto a metal door. The first one that raises the Jiggy cage is another timed challenge, so I have only a few moments to climb up the crane, run over to the ship, and leap down under the cage to get the Jiggy.
With the TNT crane, lowering it and blowing up the door allows me access to Boss Boom Box, a big box that breaks in two every time it’s attacked. The room is lined with blue eggs, suggesting that the method here is to run from danger and fire eggs into the fray, but I opt for easy mode with the Wonderwing technique. I have just enough gold feathers to get through this unscathed and collect another Jiggy.
The outer border of Rusty Bucket Bay involves a bunch of industrial acoutremon, such as the previously mentioned warehouses, plus various crates and metal boxes, and some shipping containers. There are also gaps between these areas that require you pay a small egg toll, starting with two, then four, then six, and finally eight. These tolls are pretty insignificant since I can carry 200 eggs at once and eggs litter the world.
With everything else taken care of, the last place I know I need to look is in the engine room to collect a few Jiggies and music notes, meaning I have to deal with that nightmare for good. Before getting to the engine room you have to go down a long ladder, or just leap and then do a second jump before you hit the bottom or go into your freefall animation. Next is a pathway that has a kink in it that you can either run around or leap, though this pathway only stays stationary for a few moments before doing a rotation, plunging you to instant death if you’re still standing on it.
Next is a set of three gears, each spinning opposite to one another. You have to flip onto the first, then quickly jump to the second, then to the third, and then get to solid ground again. It’s very easy to get accidentally caught by the gears and pushed off to death, which indeed happened to me once and thankfully only once.
From here I have three possible pathways. To my left or right are spinning axles that will come to a stop long enough to jump across them before starting right back up and throwing me off. From there the path on the right turns and has a similar kinked platform as seen when entering the engine room, except the kink is pointed down when it comes to rest, meaning you have to jump the gap. This is actually pretty simple, thankfully.
The path to the left, however, is super nerve-wracking. The kinked platform is opposite of the one on the right, meaning the kink rests in the up position and requires a flip to get on top. This must all be done very quickly before the platform does its rotation and sends you falling to certain death. It’s all very bad for the blood pressure.
The end of both left and right paths have some music notes but also a propeller switch to stomp. Stomping one slows the turbines on the back of the ship and stomping the other shuts them down completely for 65 seconds. As you’d guess, there’s a Jiggy behind the turbines, so to get it you have to stomp both switches and then scramble out of the engine room without falling to your death, scurry up the long ladder to the exit, Talon Trot to the back of the ship, dive into the water, line yourself up correctly with the propellers’ opening, swim through it, grab the Jiggy, and then get out, all before the timer runs out and slices you up or you misjudge and run out of air. There are so many moments where everything could go wrong here, so executing this properly on the first attempt is very satisfying.
But I’m still not done with the engine room. I ignored the Jiggy sitting out in the open between some propeller blades (who designed this engine room?), so I have to go back and grab it. When first entering the world, I jumped into a steam pipe near the back of the ship that led me to a room with a switch that slowed the propeller blades in the engine room, but I foolishly believed that it would remain pressed even after dying a few times. Not so, which means exiting the engine room, pressing the switch again, and returning to jump through the barely slowed propellers to get the Jiggy, then back through them to exit. In three attempts to get through the propellers, the first killed me (which I mentioned), the second sliced me but thankfully knocked me back onto a solid platform, and the third time I leapt through without issue. I’m done with the engine room and I never have to return. Cool, great, awesome. Let’s move on.
There’s a dolphin trapped under the ship’s anchor near the front of the ship, and it took me a lot longer to remember how to raise the anchor than I’d care to say. I could have sworn the button was somewhere in one of the rooms you enter by smashing porthole windows, but it’s actually found by swimming through the entrance around the anchor’s chain itself. The anchor switch room also has the last music notes in the world, but it doesn’t have the last Jinjo, as I thought it might.
This leaves me at a little bit of a loss since missing a Jinjo is hard to do. They generally whistle and yelp when you’re near one, letting you know very quickly that you can get one by checking the immediate area. They’re also brightly colored and wave their arms around like a wacky-inflatable-waving-arms-man, making it nearly impossible to miss one, and yet here I am, stumbling around the stage like a drunken sailor, looking for the last one.
It’s not long before it dawns on me that of the three blue shipping containers, I’d only inspected two. The ones on the right and left both have the fronts open, making it easy to go inside, but the one in the middle can only be accessed through a hole in the top, dropping you into a container full of crates. You can hear the Jinjo as soon as you enter, but finding it is sort of tricky since the crates make it super difficult to see around. It’s one of the few times the designers really leaned into the wonky camera and made it part of the challenge.
Finding that last Jinjo gives me the world’s tenth Jiggy, adding those, 100 more music notes, two honeycomb chambers, and five Jinjos to my running totals, placing things at 800 music notes, 88 Jiggies, and just two final honeycomb chambers before maxing my health. Rusty Bucket Bay takes me roughly 47 minutes to complete, with special emphasis on “rough.”
I’m thankful to be done with Rusty Bucket Bay and declare it my least favorite world of the game, but at least I have what I remember to be my favorite world still to come. The trick, however, is in finding it.
Getting to the world’s entrance is relatively easy, just continuing into Gruntilda’s lair and going past a music note door asking for some 600 or so music notes to open. This all leads to another woodland-themed area, complete with large trees, a bull, and a stump where the entrance should be. Except I haven’t found the puzzle picture to open this world yet, which can be a problem.
I don’t have the foggiest idea how I found this world’s puzzle picture when I first played since the game delivers no such hints to help you along. But, for those that know, it’s accessed all the way back near the entrance to Treasure Trove Cove. Instead of jumping down a little waterfall and going through an opening that leads to the pirate-themed area, you can swim into the pool and take a little path to the final world’s puzzle picture. I ran back through Grunty’s lair to open the world, but upon getting there discovered that I needed to press a switch to make the puzzle platform appear, which would let me place the Jiggies into the picture and open the world. I suspect this was done to avoid early players accidentally using all of their Jiggies to open the game’s final world without the means of actually entering it, but overall it feels like a really strange place to put it.
Side note about these puzzle pictures: I’m really disappointed that they don’t require you to put a puzzle together yourself and instead opt for an auto-fill option. I’d love to have to fit the pieces in the right spot and assume this as either a design choice to make the game slightly simpler and more streamlined for younger players, or it was a feature that had to be scrapped because there wasn’t enough development time to properly implement it. Oh well, you judge a game on what it has, not on what you want it to have, and what Banjo-Kazooie has is more than enough to find enjoyment.
Running back to the wooded area, I find the puzzle platform switch and give it a good stomp, making it appear in the proper location, which I then visit and place the final Jiggies into their picture, begging the question, “what is the point of the final world?” Well, I’ll tell you the point of the final world next time, when I travel into Click Clock Wood.